Working in the tabular rail view
Tabular view properties
In the Tabular view tab, rails are not visible. The modules are sorted according to their addresses (not position) within the rails. The order of the accessories does not reflect their position in the rails. Modules of decentralized rails are listed after those of the main or local rails. Go to the Graphical view tab for the complete rail engineering.
Add module or accessory
There is no need to manually create modules if you use Assign data points procedure (see step 3. Assign all data points).
- In the graphical view, click on the plus sign to open the list of available modules and accessories.
- The Add module dialog box opens.
- With Add module, you can also add additional power supply if needed.
- Select the type and address of the module.
- Add the power supply module to the main rail and local rail.
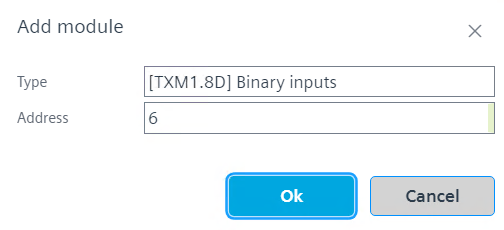
- Click OK.
- A module is added to the selected rail.
Add a new data point from the library to an I/O module
- Click the Tabular view tab on the I/O configuration area.
- In the Plants navigation view, click
 to set the drop destination focus new.
 - The data points will be assigned to this plant
 .
.
Note: It is always possible to drag a data point directly to the position in the Plants navigation view, where its functionally belongs too (for example, valve). - Select the Library tab.
- Select the data point you want to add to an I/O module.
- Drop the data point into a slot that fits. Free or compatible I/O slots are displayed in green.
- You added a new data point to an I/O module.
Move a data point
- Click the Tabular view tab on the I/O configuration area.
- Select and keep clicked the data point you want to move to another hardware slots within the same module or of another module.
- Hover the point over empty hardware slots within the same module or of another module. Empty slots that fit for the data point are indicated in green. Not possible slots are shown in red.
- Drop the point into a slot that fits.
- You have moved the data point to another hardware slot
Unassign data points from the module or onboard I/O
Go to step 3. Assign all to see how to assign I/O data points.
- Click the Tabular view tab on the I/O configuration area.
- Select the data point that you want to unassign from the module.
- Right-click the data point and click Unassign.
- Select the module to unassign the data points.
- Right -click the selected module and click Unassign data points.
- You have unassigned the data points from the module or onboard I/O.
Delete data point
- Click the Tabular view tab on the I/O configuration area.
- Select the data point that you want to delete from the module or in the Plants navigation view in case the point is not assigned.
- Right-click the selected data point and click Delete.
- You have deleted the data point.
Duplicate data points
- Click the Tabular view tab on the I/O configuration area.
- Select the data point you want to duplicate.
- Right-click the selected data point and click Duplicate.
- Select the module to duplicate the data points.
- Right-click the selected module and click Duplicate data points.
- You have duplicated the data points from the plant.
Change type of module
- Click the Tabular view tab on the I/O configuration area.
- Select the module you want to change.
- Right-click the selected module and click Change-type.
- The tool presents the possible module types that fit to the already assigned data points.
- Select the type of module from the drop-down list.
- You have changed the type of module. The user can only change to the possible module types that fit to the already assigned data points.
Delete modules or accessories
- Click the Tabular view tab on the I/O configuration area.
- Select the module that you want to delete from the rail.
- Right-click the selected module and click Delete.
- You have deleted the module or accessory from the rail. Any assigned data points of the deleted module will be unassigned.
You have to delete the belonging rail in order to delete the automatically created bus interface modules TXA1.IBE (see Graphical view).